Thursday, January 28, 2016

How to Make a Quick Valentine's Day Gift or Gift Tags

Don't you just love when you can make something pretty from things that most people throw away?

If you need a quick and easy gift for Valentine's Day (or any other holiday) then get out your needles, some embroidery floss, a pair of old jeans and a little bit of quilt batting because it's so easy to create these cute little recycled hearts.

https://www.etsy.com/listing/265992868/recycled-denim-embroidered-heart?ref=shop_home_active_2
 
 
I don't use an embroidery hoop so I start by cutting out two denim hearts.  If you like to use the hoop, you'll need to draw your heart on the denim, leaving enough to fit in your hoop.   Mine measure 3 1/2" wide by 3" tall but you can make your hearts as big (or as small) as you like.
 
Next, grab your embroidery needle and the embroidery floss in the color you choose and use a stem stitch to embroider whatever you want on your heart.  I  usually freehand a word or a saying and then add a little something to give it a bit more color or to fill it in more. 
 
On the heart above, I stitched the word LOVE and the small red flower before assembling the heart.
 
After you embroider your heart, place one plain denim heart face down on your table, cut a heart shaped piece of batting and place it on the face down heart.  Now, take your pretty little embroidered heart and place it, face up, on top of the batting. 
 
At this point, you can pin your three pieces together (I never pin because I've been stuck on more than one occasion).
 
Now just whip stitch around the three layers.  I also added a little running stitch just inside of the whipstitch to give it a bit of a quilted look.
 
Add a piece of embroidery floss for a hanger and tada!!!  Look how crafty (not to mention thrifty) you are!
 
You can make your hearts simple like these:
 
https://www.etsy.com/listing/265889163/recycled-denim-embroidered-heart?ref=shop_home_active_6

https://www.etsy.com/listing/265884647/recycled-denim-embroidered-heart?ref=shop_home_active_1
 
 
Or you can get a little crazy like this:
 
 
https://www.etsy.com/listing/265991858/recycled-denim-embroidered-heart?ref=shop_home_active_8

https://www.etsy.com/listing/265888169/recycled-denim-embroidered-heart?ref=shop_home_active_10
 

However you decide, they are sure to be loved.  :)

If you have any questions, just let me know in the comments and I'll answer asap.  And, if you don't have time to make your own this year, I have some in my shop (yep, I love making these and can't seem to stop). 

I hope you enjoy these fun little hearts.


Monday, October 12, 2015

DIY Rustic Snowman Ornaments from Old Wood Tool Handles


These snowmen were a lot of fun to make! 

If you have some old wooden tool handles, you could easily make some, too.

I bought this bucket of old wood handles a couple of years ago.  Here's the post.  Sad how excited I get about these things, huh?

Anyhoo, I've carved a few of them into Santa's but decided to make some snowmen.

Here's what they looked like before:


And this is what they look like now:


Cute, huh?

If you want to make some rustic snowmen, it's super easy.  If I can do it, you can too!

Just paint your wood handle (I used milk paint because I feel so cool when I use it) and then paint a face on them.  It doesn't matter if the faces are perfect, they each have their own character, so don't judge them lest you be judged.  You can spray them with some matte sealer at this point and let them dry.  You are free to fill up the time it takes to dry them however you wish or you can go dig through your fabric stash because you're going to need some scraps.

After your snowmen are dry, your can dress them up however you'd like. 

I found some red and white striped fabric in my stash and used it for all of their hats.  I just took a scrap, wrapped it around the top of his head and cut upwards to make a point at the top of his cap - we don't need no stinkin' pattern for something this simple.  I also cut a strip of quilt batting and folded it on the bottom of the opened fabric hat.  Then just whip stitch the back of the hat, glue it to his head (I used Gorilla Super Glue), cut a length of fabric for his scarf, tie the scarf with a secure knot and voila, you have snowmen ornaments! 

I hope you enjoy making some of these rustic snowmen for your Christmas tree.  If you don't have time to make your own, I've listed some in my Etsy Shop HERE.

I'd love to see some pics if you make them and let me know if you have any questions.

Have a great week everyone!  ~  Debra

Friday, October 9, 2015

My Newest Heirloom Santa Carving


Remember this guy?


I started him before we moved two years ago.  Now that we are all settled in, I finished him and this is how he looks today.


You can see more pics of him HERE along with some of my other carvings in my Etsy Shop.  :)

I think my favorite Santa's are the old world Santa's. 

What are your favorite kinds of carved Santa's?

Have a great weekend everyone!  ~ Debra

Monday, November 18, 2013

My Carved Santa Featured in Zibbet's Fantastic Five!


What a great honor to have one of my Santa carvings featured in this week's Zibbet's Fantastic Five! 

http://www.zibbet.com/blog/2013.11.17/fantastic-five-trim-a-tree

Check him out here and be sure to check out all of the other items that made the Fantastic Five!

Have a great evening, everyone!  ~ Debra

Wednesday, November 13, 2013

Free Crochet Coaster or Mug Rug Pattern Thick, Absorbent Cotton!


These mug rugs or coasters would make a great (and super simple) Christmas gift for someone you know this year.  Just think of all of the gifts you can cross off of your list simply by whipping up a few mug rugs/coasters each day.

Very easy, very quick, very inexpensive.  Give them alone or tuck them into a gift basket - so cute! 

Note:  These are NOT your grandma's coasters!  These coasters (mug rugs) are triple thick, sturdy, absorbent and oh so modern!  :)

Teachers, coworkers, friends, and others will love these.   Give one or give a whole set in the colors they love and you'll know you've given something from your heart that they can use for years to come.

Here's how your finished mug rugs will look (I used Lily's Seaside and a mix of blues and greens):


Now, I've never written a crochet pattern and didn't use a pattern to make these so please bear with me and feel free to ask any questions.  I've been making my coasters like this for years with just a simple combo of stitches that I use for lots of projects. 

Finished size will be about 4 1/2" square.

Now for the supplies, you'll need:

cotton yarn (I really like Lily's Sugar 'N Cream) any 3 colors
any size crochet hook (I used a size H but gauge really doesn't matter)
tapestry needle to weave in ends

Working with 3 strands held together, Ch 11.

Row 1: Sc in second chain from hook and in each ch across, ch 1, turn.

Row 2: Hdc in second sc from hook, sc in next sc.  *Hdc in next sc, sc in next sc*.  Repeat from * across, ending with a single crochet at the end of row.

Repeat row 2 until desired size.  (I make mine square)  Do not turn.

Border:  Ch 1, sc evenly around perimeter using 3 sc in each corner.  Slip stitch to beginning border sc.  Finish off.  Weave in ends.

You will love the sturdy feel of these coasters (mug rugs).  They are nothing like the old fashioned, single strand coasters your granny made.  Btw, if you make these a little bigger you will have some great potholders!

AND you can make them in any color or combination of colors you like.  :)


Enjoy!

Have a great week, everyone!  :)

Debra

Saturday, November 2, 2013

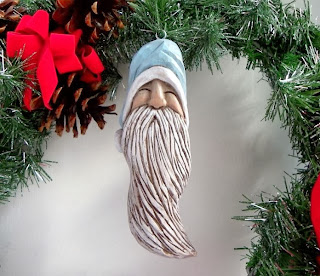
Finished Carved Santa Ornament with Light Blue Hat


Here's the little guy I painted yesterday.  Remember how he looked here?

What a difference a day makes! 

This my newest hand carved Santa ornament today:


I like the way he turned out - he looks happier than he did yesterday, lol.  What do you think?
 
You can see more pics of this guy by clicking the link above or clicking my shop here.  :)
 
Have a great weekend, everyone!  ~ Debra


Friday, November 1, 2013

One of My Newest Santa Carvings - Carved Santa Ornament


Here is my newest Santa carving.  He's a hand carved Santa ornament and I love his long, saggy hat and curvy beard. 

I carved him yesterday morning but got distracted later in the day.  I brought him into the studio and painted him today so I'll get some pics of him tomorrow to show you all of his finishing touches but this is what he looked like when he was still out in the woodshop.


Cute, huh?
 

I carved this Santa ornament using my favorite method to carve.  No pattern!  Just doodle on the wood and start chipping away - you'll end up with a one-of-a-kind carving every single time.  :)
 
I also have a few of the wooden tool handles carved so I'll try to post some pics of those tomorrow, too.
 
Happy weekend, everyone!!!  :)  ~ Debra